Galgame汉化中的逆向(特别篇一):ArmArm64_ELF中汉化字符串超长修改方法 by devseed , 本贴论坛和我的博客 同时发布
0x0 前言 之前发的Galgame汉化中的逆向系列,大多是结合具体游戏来谈谈分析思路与汉化方法。大多数主机游戏可执行文件都是魔改的ELF文件(比如说psv,ps4系统内核就是由FreeBSD修改而来的),不同于以x86架构为主的pc平台,主机平台架构可谓是百花齐放:psp,ps2是mips架构,ps3是powerpc架构,ps4是x86架构,psv是arm架构,switch是arm64架构 。ps4的x86架构修改方法和pc版类似,powerpc架构的汇编暂时还没研究,mips架构汇编相关的分析,今后有时间可能会更新教程。由于arm指令一般情况下都是4字节定长(还有2字节的thumb指令),mov,ldw等指令的立即数有范围限制,寻址方式多为相对于PC的偏移寻址,这与x86里立即数可以直接写VA地址(如FF 15系列长跳转指令、b8系列的mov)有很大区别。因此这篇作为《galgame汉化中的逆向》系列教程的补充,来聊聊ELF结构、如何对ELF修改、Arm汇编寻址方法以及如何修改Arm汇编中字符串的指针 。
一般来说主机游戏剧本、字库等都在资源文件(封包文件)中,可执行文件中只有少量的系统文本。这部分通常也不需要汉化比原字符长(因为系统文本一般没有太多含义,且汉语本身就比较简洁),因此直接替换二进制字符就行了。但是对于一些特列,即字库或剧本整体封在了可执行文件中,就要增加区段和用汇编修改指针把字符串重定向到新增区段中了。如psv、switch版的Gnosia,和psv、ps3版的WhiteAlbum2,修改eboot方法详见PSV版WA2汉化移植 。
为了更直观地说明原理和看到运行结果,本篇教程将不以具体游戏为例,而是用arm版helloword程序,讲解一下修改arm、arm64 ELF的方法。理论上适用于psv、swich、android平台的可执行文件或动态库,根据不同平台可能需要再转换为其对应的魔改ELF格式。
0x1 工具准备 本篇教程需要的工具:
Debain系Linux(WSL、虚拟机或实机)
lief(elf解析与编辑),readelf(binutil里的elf查看器),hexdump(查看二进制)
keystone(arm assembler),capstone(arm disassembler)
qemu-arm-static,qemu-aarch64-static(qemu-user模式,用于运行arm elf)
arm-linux-gnueabihf-g++,aarch64-linux-gnu-g++ (arm, arm64交叉编译)
ida,ida64,arm-linux-gnueabihf-objdump,aarch64-linux-gnu-objdump (查看反汇编)
参考网站:
https://www.mztn.org/dragon/arm6405str.html
http://armconverter.com/
安装脚本如下:
1
2
3
4
5
6
sudo apt-get update sudo apt-get install gcc-arm-linux-gnueabihf g++-arm-linux-gnueabihf # arm32 sudo apt-get install gcc-aarch64-linux-gnu g++-aarch64-linux-gnu # arm64 sudo apt-get install qemu-user-static binfmt-support sudo apt-get install gdb-multiarch pip3 install lief keystone-engine capstone
最简单的hello world程序代码:
1
2
3
4
5
6
# include <iostream> using namespace std;int main () cout<<"hello world" <<endl; }
交叉编译命令行:
1
2
3
cd build arm-linux-gnueabihf-g++ ./../hello.cpp -o hello_arm aarch64-linux-gnu-g++ ./../hello.cpp -o hello_arm64
运行命令行:
1
2
qemu-arm-static -L /usr/arm-linux-gnueabihf/ ./hello_arm qemu-aarch64-static -L /usr/aarch64-linux-gnu/ ./hello_arm64
0x2 ELF介绍与增加区段方法 Linux系统的可执行文件和动态库为ELF格式,与windows的pe类似。里面的几个重要结构为:ELF header、Section Header Table‘、Program Header Table。关于section和segment关系如下
segments与sections是包含的关系,一个segment包含若干个section。
segments是从运行的角度来描述elf文件,通常在elf的头部
sections是从链接的角度来描述elf文件,通常在elf的尾部
1 2 3 4 5 6 7 8 9 10 11 12 13 14 15 16 17 18 19 20 21 22 #define EI_NIDENT 16 struct Elf32_Ehdr { unsigned char e_ident[EI_NIDENT]; Elf32_Half e_type; Elf32_Half e_machine; Elf32_Word e_version; Elf32_Addr e_entry; Elf32_Off e_phoff; Elf32_Off e_shoff; Elf32_Word e_flags; Elf32_Half e_ehsize; Elf32_Half e_phentsize; Elf32_Half e_phnum; Elf32_Half e_shentsize; Elf32_Half e_shnum; Elf32_Half e_shstrndx; }; typedef struct { Elf64 ... } Elf64_Ehdr;
e_entry:程序入口地址
e_ehsize:ELF Header结构大小
e_phoff、e_phentsize、e_phnum:描述Program Header Table的偏移、一项的大小、数量。
e_shoff、e_shentsize、e_shnum:描述Section Header Table的偏移、一项的大小、数量。
e_shstrndx:这一项描述的是section_name字符串表在Section Header Table中的索引,
1
2
3
4
5
6
7
8
9
10
11
12
13
14
15
16
17
typedef struct { Elf32_Word sh_name; Elf32_Word sh_type; Elf32_Word sh_flags; Elf32_Addr sh_addr; Elf32_Off sh_offset; Elf32_Word sh_size; Elf32_Word sh_link; Elf32_Word sh_info; Elf32_Word sh_addralign; Elf32_Word sh_entsize; } Elf32_Shdr; typedef struct { Elf64... }Elf64_Shdr;
ELF文件的段结构就是由段表决定的。
1
2
3
4
5
6
7
8
9
10
11
12
13
14
15
16
typedef struct { Elf32_Word p_type; Elf32_Off p_offset; Elf32_Addr p_vaddr; Elf32_Addr p_paddr; Elf32_Word p_filesz; Elf32_Word p_memsz; Elf32_Word p_flags; Elf32_Word p_align; } Elf32_Phdr; typedef struct { Elf64_Word ... } Elf64_Phdr;
(4) readelf, objdump, hexdump 常用readelf来查看elf结构,objdump来查看反汇编,命令行如下:
1
2
3
4
5
6
7
8
9
10
11
12
13
14
15
readelf -h|--file-header elffile //查看elf头,可以与下面多个选项组合 readelf -S|--sections elffile //查看elf section头 readelf -l|-–segments elffile //查看elf segment头 readelf -x|--hexdump .sect_name|number elffile// 通过数字或name hexdump section readelf -r elffile //查看elf 重定位 readelf -d elffile //查看elf .dynamic段, needed objdump -f|--file-headers elffile //显示obj类型 objdump -x|--all-headers libxxxxx.so | grep NEEDED //-x 显示所可用的头信息 objdump -s [-j name] elf //-s 对section反汇编, -j 显示section的信息, 如.data objdump -d [--start-address=address] [--stop-address=address] elffile //反编译 hexdump [-s|--skip skip_offset] [-n|--length size] <file> -C 显示asci和hex -d|x 两字节10进制,16进制显示
(5) lief 关于添加新区段,可以自己手动修改ELF文件头对应的索引增加区段,可以参见android so手动增加区段 。我以前也写过windowsPE增加区段的轮子simpledpack ,这次就不再自己造轮子了,直接用lief解析ELF了。这个库逻辑挺清晰的:
a. 添加区段并patch例子:
1
2
3
4
5
6
7
8
9
10
11
12
libsdl_main_jni = lief.parse("hello" ) sec_hookstr = lief.ELF.Section(".hookstr" , lief.ELF.SECTION_TYPES.PROGBITS) sec_hookstr += lief.ELF.SECTION_FLAGS.EXECINSTR sec_hookstr.alignment = 4 sec_hookstr.content = list (bytes ('hooked str hello world!\n' , encoding='ansi' )) sec_hookstr = libsdl_main_jni.add(sec_hookstr) libsdl_main_jni.patch_address(0x15D0 , [0X36 , 0X5A ]) libsdl_main_jni.write("hello_hook" )
b. 扩容区段例子:
1
2
3
4
5
6
7
8
9
10
for section in libsdl_main_jni.sections: if section.name == '.rodata' : print (hex (section.offset), section.size) byte_arr = list (bytes ('/data/data/cn.natdon.onscripterv2yuri/lib/libapp_%s.so\0' , encoding='ansi' )) arr_offset = section.offset+section.size section.size += len (byte_arr) libsdl_main_jni.segments[1 ].virtual_size += len (byte_arr) libsdl_main_jni.segments[1 ].physical_size += len (byte_arr) libsdl_main_jni.patch_address(arr_offset, byte_arr) libsdl_main_jni.patch_address(0x21C8 , list ((arr_offset-0x2104 ).to_bytes(2 , 'little' )))
c. sym替换(类似于IAThook)
1
2
fopen_sym = next (filter (lambda e : e.name == "fopen" , libxxx.imported_symbols)) fopen_sym.name = "fopen_saf"
0x3 Arm寻址分析与修改方法 32位的arm通常是通过当前PC寄存器找到内存偏移表地址,再通过表中偏移计算出最终地址,相当于两次对内存寻址找到最终地址。通常用add pc, Rd或adr Rd, offset,之后ldr Rd来获得最终地址。内存偏移表通常在一个函数的结尾处(BLX LR函数返回后),每项存储4字节偏移。
(1) thumb ldr thumb指令为2字节定长,在psv的eboot和android的so里面会经常出现这种指令集。
这种情况下内存偏移表存储的是相对于add Rd, pc的偏移,即value_addr-(addpc_addr+4)(因为PC指向当前指令的两条之后,thumb指令集长度为2,所以此时的PC指向cur_addr+4) ,下面通过实例来分析:
1
2
3
4
5
6
7
8
9
10
11
12
13
14
// ida libapp_onscripter-32bpp.so .text:00013F78 25 48 LDR R0, =(aUsageOnscripte - 0x13F80) ; "Usage: onscripter ... ;aUsageOnscripte 00048B70, 0X13F7C+4=0x13F80, 0X48B70-0x13F80=34BF0, 相对于add pc偏移 .text:00013F7A 08 B5 PUSH {R3,LR} .text:00013F7C 78 44 ADD R0, PC ; "Usage: onscripter [option ...]\n" .text:00013F7E FF F7 E5 FF BL sub_13F4C .... .text:00014010 F0 4B 03 00 off_14010 DCD aUsageOnscripte - 0x13F80 // arm-linux-gnueabihf-objdump -d --start-address 0x13f78 --stop-address 0x14014 libapp_onscripter-32bpp.so 13f78: 4825 ldr r0, [pc, #148]; 94h,(14010 <_Z10optionHelpv+0x98>) 13f7a: b508 push {r3, lr} 13f7c: 4478 add r0, pc 13f7e: f7ff ffe5 bl 13f4c <__gnu_Unwind_Find_exidx@plt+0x34>
可见ida里面机器码为文件中的字节顺序,指令转义为了ldr伪指令;而objdump中机器码为小端整数,指令转换成直接对应汇编的样子,因此学习arm汇编看objdump比较直观。
13f78:4825 ldr r0, [pc, #148]为访问内存偏移表内容指令,偏移表地址13f78h+4+#148(94h)=14010h,即把偏移表存储的偏移34BF0h载入r0;偏移表里的内容为.text:00014010 F0 4B 03 00,是相对于13f7c: 4478 add r0, pc的偏移;13f7c:4478 add r0, pc,最终地址为34BF0h+13F7Ch+4=48B70h。
(2) ldr, adr arm 4字节ldr,adr伪指令转换为add register, pc [#offset]。机器码的存储格式如下:
1
2
31 27 26 25 24 05 00 LDR32 0 0 0 1 1 0 0 0 imm19 (4倍されて, ±1MB) Rt(5bit)
同样有内存偏移表,但此偏移表存储的偏移值为相对于偏移表地址的偏移。下面为编译的hello_arm中_start函数的反汇编内容:
1
2
3
4
5
6
7
8
9
10
11
12
13
14
15
16
17
18
19
20
21
22
23
24
25
26
27
28
29
30
31
32
33
34
35
36
37
38
39
40
41
42
43
44
45
46
47
48
49
.text:00000648 _start .text:00000648 4F F0 00 0B MOV.W R11, #0 .text:0000064C 4F F0 00 0E MOV.W LR, #0 .text:00000650 02 BC POP {R1} ; argc .text:00000652 6A 46 MOV R2, SP ; ubp_av .text:00000654 04 B4 PUSH {R2} ; stack_end .text:00000656 01 B4 PUSH {R0} ; rtld_fini .text:00000658 DF F8 24 A0 LDR.W R10, =($_GLOBAL_OFFSET_TABLE_ - 0x680) ; $_GLOBAL_OFFSET_TABLE_ 10FAC = 680 + 1092c 相对于偏移表的偏移。 .text:0000065C 08 A3 ADR R3, off_680 .text:0000065E 9A 44 ADD R10, R3 ; $_GLOBAL_OFFSET_TABLE_ .text:00000660 DF F8 20 C0 LDR.W R12, =(__libc_csu_fini_ptr - 0x10FAC) .text:00000664 5A F8 0C C0 LDR.W R12, [R10,R12] ; __libc_csu_fini .text:00000668 4D F8 04 CD PUSH.W {R12} ; fini .text:0000066C 06 4B LDR R3, =(__libc_csu_init_ptr - 0x10FAC) .text:0000066E 5A F8 03 30 LDR.W R3, [R10,R3] ; __libc_csu_init ; init .text:00000672 06 48 LDR R0, =(main_ptr - 0x10FAC) .text:00000674 5A F8 00 00 LDR.W R0, [R10,R0] ; main ; main .text:00000678 FF F7 D4 EF BLX __libc_start_main .text:0000067C FF F7 BA EF BLX abort .text:00000680 2C 09 01 00 off_680 DCD $_GLOBAL_OFFSET_TABLE_ - 0x680 .text:00000684 40 00 00 00 off_684 DCD __libc_csu_fini_ptr - 0x10FAC .text:00000688 38 00 00 00 off_688 DCD __libc_csu_init_ptr - 0x10FAC .text:0000068C 2C 00 00 00 off_68C DCD main_ptr - 0x10FAC // objdump -d hello_arm 00000648 <_start>: 648: f04f 0b00 mov.w fp, #0 64c: f04f 0e00 mov.w lr, #0 650: bc02 pop {r1} 652: 466a mov r2, sp 654: b404 push {r2} 656: b401 push {r0} 658: f8df a024 ldr.w sl, [pc, #36] ; 65ch+24h=680 <_start+0x38> 65c: a308 add r3, pc, #32 ; (adr r3, 680 <_start+0x38>) 65e: 449a add sl, r3 660: f8df c020 ldr.w ip, [pc, #32] ; 684 <_start+0x3c> 664: f85a c00c ldr.w ip, [sl, ip] 668: f84d cd04 str.w ip, [sp, #-4]! 66c: 4b06 ldr r3, [pc, #24] ; (688 <_start+0x40>) 66e: f85a 3003 ldr.w r3, [sl, r3] 672: 4806 ldr r0, [pc, #24] ; (68c <_start+0x44>) 674: f85a 0000 ldr.w r0, [sl, r0] 678: f7ff efd4 blx 624 <__libc_start_main@plt> 67c: f7ff efba blx 5f4 <abort@plt> 680: 0001092c .word 0x0001092c 684: 00000040 .word 0x00000040 688: 00000038 .word 0x00000038 68c: 0000002c .word 0x0000002c
658:f8df a024 ldr.w sl, [pc, #36]为加载内存偏移表内容指令,658h+#36(24h)+4=680h为内存偏移表地址,加载内存偏移表存储的偏移值1092ch到s1寄存器;65c:a308 add r3, pc, #32,紧接着将r3载入内存偏移表地址,即65ch+#32(20h)+4=680h。65e:449a add sl, r3得到最终地址1092ch+680h=10fach,因此这里内存偏移表内存储的偏移是最终地址相对于内存偏移表地址的偏移。
(3) 编程修改ARM汇编字符串地址 由于arm汇编是用PC和内存偏移表进行寻址,所以修改ldr的最终读取的地址仅需要修改内存偏移表中的偏移。
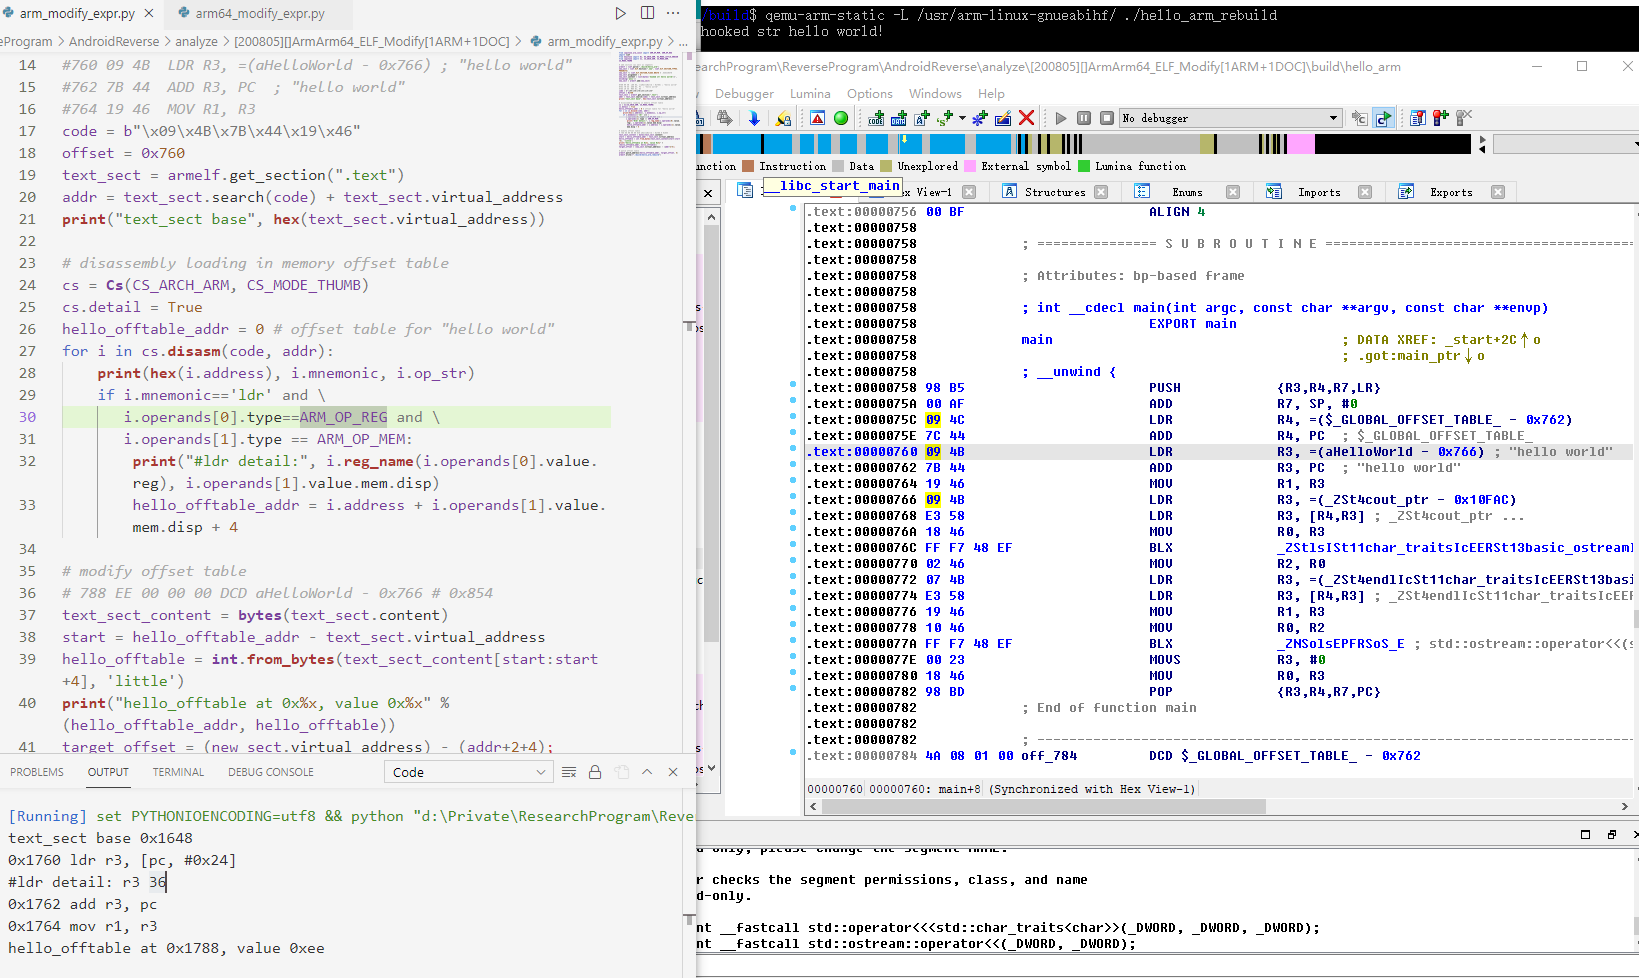
修改arm汇编字符串地址的测试用例如下:用lief增加区段,内容为”hooked str hello world!\n”,capstone反汇编解析ldr的内存偏移表地址,修改内存偏移表内的值改为新增加区段的字符串相对偏移(注意偏移值是相对于add pc处的,脚本里统一用VA相减表示)
1
2
3
4
5
6
7
8
9
10
11
12
13
14
15
16
17
18
19
20
21
22
23
24
25
26
27
28
29
30
31
32
33
34
35
36
37
38
39
40
41
42
43
44
45
import lieffrom capstone.arm_const import ARM_OP_MEM, ARM_OP_REGfrom keystone import Ks, KS_ARCH_ARM, KS_MODE_LITTLE_ENDIANfrom capstone import Cs, CS_ARCH_ARM, CS_MODE_ARM, CS_MODE_THUMBarmelf = lief.parse("./build/hello_arm" ) new_sect = lief.ELF.Section(".new" , lief.ELF.SECTION_TYPES.PROGBITS) new_sect += lief.ELF.SECTION_FLAGS.WRITE new_sect.alignment = 4 new_sect.content = list (bytes ('hooked str hello world!\n' , encoding='ansi' )) new_sect = armelf.add(new_sect) code = b"\x09\x4B\x7B\x44\x19\x46" offset = 0x760 text_sect = armelf.get_section(".text" ) addr = text_sect.search(code) + text_sect.virtual_address print ("text_sect base" , hex (text_sect.virtual_address))cs = Cs(CS_ARCH_ARM, CS_MODE_THUMB) cs.detail = True hello_offtable_addr = 0 for i in cs.disasm(code, addr): print (hex (i.address), i.mnemonic, i.op_str) if i.mnemonic=='ldr' and \ i.operands[0 ].type ==ARM_OP_REG and \ i.operands[1 ].type == ARM_OP_MEM: print ("#ldr detail:" , i.reg_name(i.operands[0 ].value.reg), i.operands[1 ].value.mem.disp) hello_offtable_addr = i.address + i.operands[1 ].value.mem.disp + 4 text_sect_content = bytes (text_sect.content) start = hello_offtable_addr - text_sect.virtual_address hello_offtable = int .from_bytes(text_sect_content[start:start+4 ], 'little' ) print ("hello_offtable at 0x%x, value 0x%x" %(hello_offtable_addr, hello_offtable))target_offset = (new_sect.virtual_address) - (addr+2 +4 ); armelf.patch_address(hello_offtable_addr, target_offset, 4 ) armelf.write(r"./build/hello_arm_rebuild" )
运行patch脚本后,qemu测试hook成功!
0x4 Arm64寻址分析与修改方法 arm64和arm同样是定长指令和相对于PC的寻址,只不过arm64没有内存偏移表了,用adrp @page和add|ldr @pageoff来寻址。
(1) adrp 指令分析 1 2 ADRP Xd, val_page_addr ;@page Xd = addr + (PC - (PC & 0xfff)) add Xd, Xd, :lo12:val ;@pageoff
ADRP指令是以页为单位的大范围的地址读取指令,P为page, pageoff为page offset,这里填写的地址是最终地址的页基址,汇编会自动把opcode转换成相对于pc页基址的地址。
符号扩展一个21位的offset(immhi+immlo)。向左移动12位,将PC的值的低12位清零,然后把这两者相加,结果写入到Xd寄存器,用来得到一块含有label的4KB对齐内存区域的base地址(也就是说label所在的地址,一定落在这个4KB的内存区域里,指令助记符里Page也就是这个意思), 可用来寻址 +/- 4GB的范围(2^33次幂)。
下面是几种指令的机器码比较:
1 2 3 4 5 6 7 8 31 27 26 25 24 05 00 LDR32 0 0 0 1 1 0 0 0 imm19 (4倍されて, ±1MB) Rt(5bit) LDR64 0 1 0 1 1 0 0 0 imm19 (4倍されて, ±1MB) Rt(5bit) LDRSW 1 0 0 1 1 0 0 0 imm19 (4倍されて, ±1MB) Rt(5bit) 31 29 24 05 00 ADR 0 immL(2bit) 1 0 0 0 0 immHi (19bit) Rd(5bit) ADRP 1 immL(2bit) 1 0 0 0 0 immHi (19bit) Rd(5bit)
下面代码说明了,adrp的机器码immhi+immlo存储的是相对于当前页面的页偏移0x22000,但是反汇编后显示的则是目标的VA,即adrp x0, #0x25000(当此指令在0x3000处时候,cs.disasm(code, 0x3000))。
1 2 3 4 5 6 7 8 9 10 11 12 from capstone import Cs, CS_ARCH_ARM64, CS_MODE_ARMcode = b'\x00\x01\x00\xd0' cs = Cs(CS_ARCH_ARM64, CS_MODE_ARM) i = next (cs.disasm(code, 0x3000 )) print (i.mnemonic, i.op_str) code_int = int .from_bytes(code, 'little' ) immHi = (code_int&0x00ffffff )>>5 immL = code_int>>29 & 0b11 imm =(immHi<<2 |immL)<<12 print (f"code_int=0b{code_int:b} " ) print (f"immHi=0b{immHi:b} , immL=0b{immL:b} , imm=0x{imm:x} " )
(2) @page,@pageoff寻址 adrp @page 找到目标页地址,add @pageoff加上页内偏移。如果用ida的keypatch修改,需要去掉@page,@pageoff后缀,手动来计算目标页地址和页内偏移才行。ida和objdump的反汇编代码如下:
1 2 3 4 5 6 7 8 9 10 11 12 13 14 15 16 17 18 19 20 21 22 23 24 25 26 27 28 29 30 31 32 33 34 35 // ida hello_arm64 .text:00000000000009DC main ; DATA XREF: .got:main_ptr↓o .text:00000000000009DC FD 7B BF A9 STP X29, X30, [SP,#-0x10+var_s0]! .text:00000000000009E0 FD 03 00 91 MOV X29, SP .text:00000000000009E4 00 00 00 90 ADRP X0, #aHelloWorld@PAGE ; "hello world", .text:00000000000009E8 01 00 2D 91 ADD X1, X0, #aHelloWorld@PAGEOFF;0xb40 .text:00000000000009EC 80 00 00 90 ADRP X0, #_ZSt4cout_ptr@PAGE .text:00000000000009F0 00 E4 47 F9 LDR X0, [X0,#_ZSt4cout_ptr@PAGEOFF] .text:00000000000009F4 9F FF FF 97 BL ._ZStlsISt11char_traitsIcEERSt13basic_ostreamIcT_ES5_PKc ; std::operator<<<std::char_traits<char>>(std::ostream &,char const*) 0000000009F8 E2 03 00 AA MOV X2, X0 .text:00000000000009FC 80 00 00 90 ADRP X0, #_ZSt4endlIcSt11char_traitsIcEERSt13basic_ostreamIT_T0_ES6__ptr@PAGE .text:0000000000000A00 01 DC 47 F9 LDR X1, [X0,#_ZSt4endlIcSt11char_traitsIcEERSt13basic_ostreamIT_T0_ES6__ptr@PAGEOFF] .text:0000000000000A04 E0 03 02 AA MOV X0, X2 .text:0000000000000A08 9E FF FF 97 BL ._ZNSolsEPFRSoS_E ; std::ostream::operator<<(std::ostream & (*)(std::ostream &)) .text:0000000000000A0C 00 00 80 52 MOV W0, #0 .text:0000000000000A10 FD 7B C1 A8 LDP X29, X30, [SP+var_s0],#0x10 .text:0000000000000A14 C0 03 5F D6 RET // aarch64-linux-gnu-objdump -d hello_arm64 00000000000009dc <main>: 9dc: a9bf7bfd stp x29, x30, [sp, #-16]! 9e0: 910003fd mov x29, sp 9e4: 90000000 adrp x0, 0 <_init-0x810> ; aHelloWorld pageaddr 9e8: 912d0001 add x1, x0, #0xb40 ; #aHelloWorld@PAGEOFF 9ec: 90000080 adrp x0, 10000 <__FRAME_END__+0xf340> 9f0: f947e400 ldr x0, [x0, #4040] 9f4: 97ffff9f bl 870 <_ZStlsISt11char_traitsIcEERSt13basic_ostreamIcT_ES5_PKc@plt> 9f8: aa0003e2 mov x2, x0 9fc: 90000080 adrp x0, 10000 <__FRAME_END__+0xf340> a00: f947dc01 ldr x1, [x0, #4024] a04: aa0203e0 mov x0, x2 a08: 97ffff9e bl 880 <_ZNSolsEPFRSoS_E@plt> a0c: 52800000 mov w0, #0x0 // #0 a10: a8c17bfd ldp x29, x30, [sp], #16 a14: d65f03c0 ret
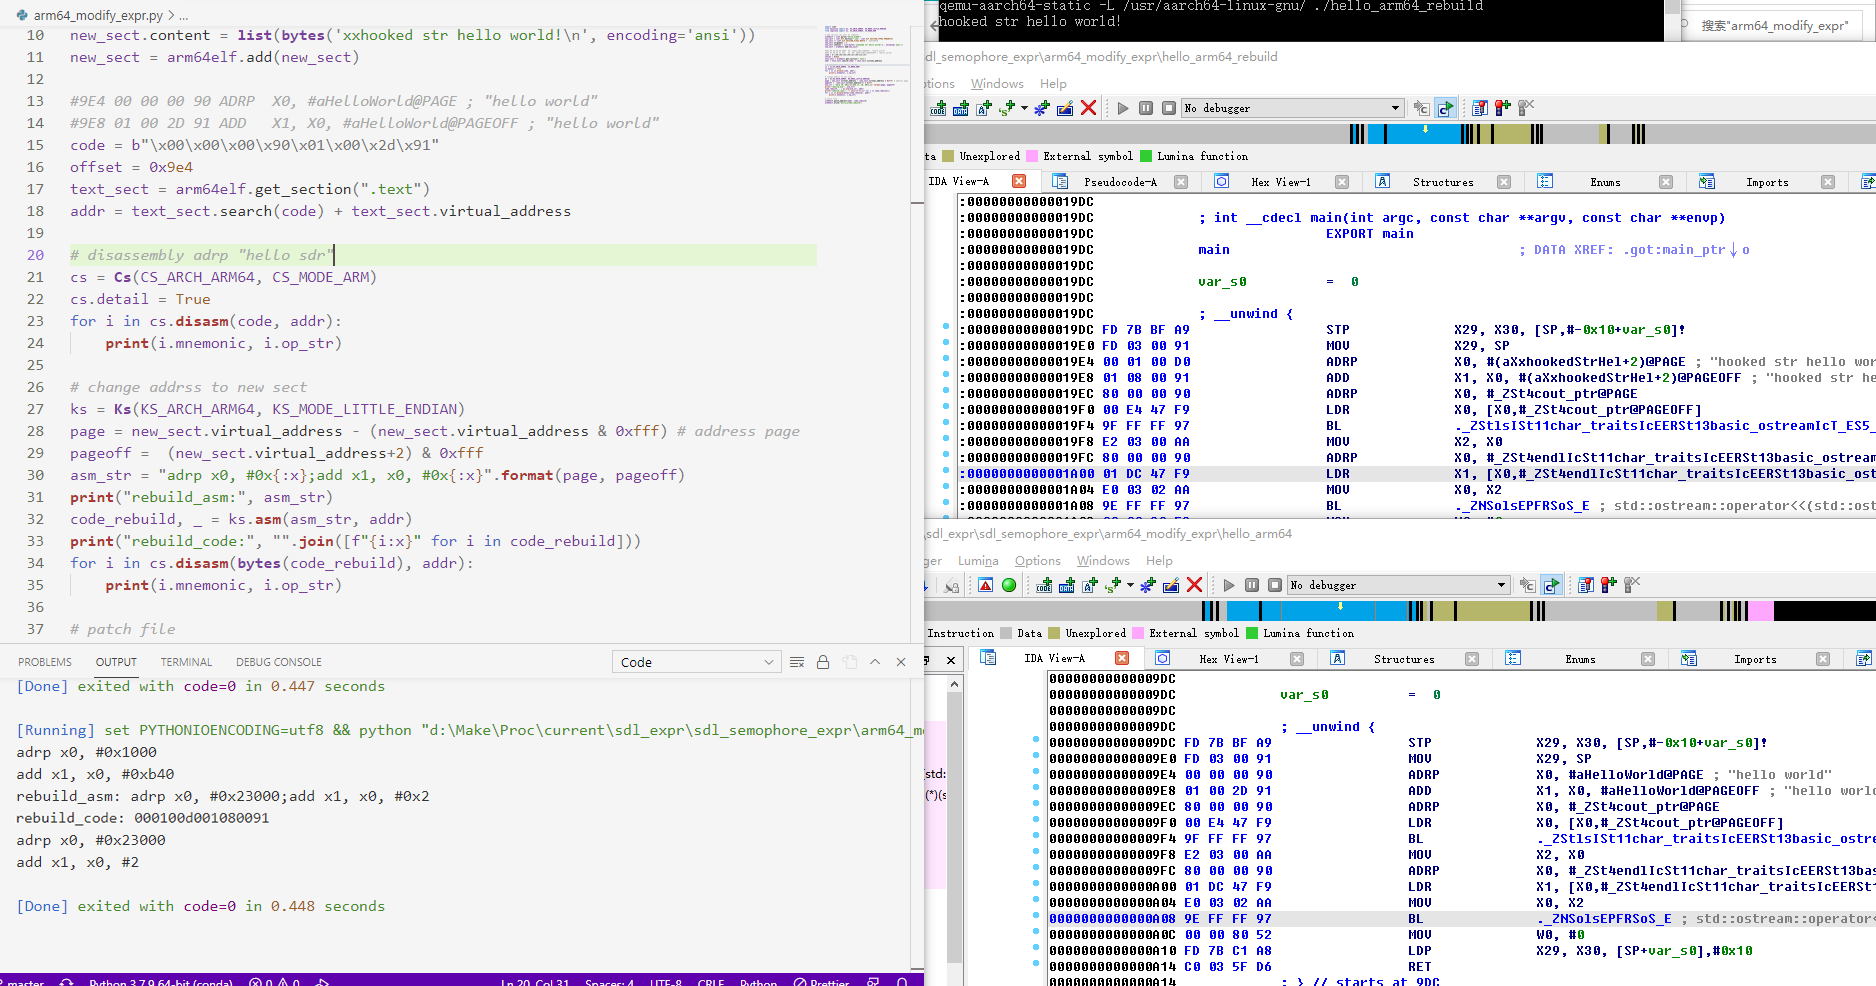
(3) 编程修改ARM汇编字符串地址 下面的python脚本说明了如何用capstone进行反汇编,如何手动求目标页地址和页内偏移,以及之后用keystone进行汇编更新adrp @page和add @pageoff指令。
1 2 3 4 5 6 7 8 9 10 11 12 13 14 15 16 17 18 19 20 21 22 23 24 25 26 27 28 29 30 31 32 33 34 35 36 37 38 39 import lieffrom keystone import Ks, KS_ARCH_ARM64, KS_MODE_LITTLE_ENDIANfrom capstone import Cs, CS_ARCH_ARM64, CS_MODE_ARMarm64elf = lief.parse("./build/hello_arm64" ) new_sect = lief.ELF.Section(".new" , lief.ELF.SECTION_TYPES.PROGBITS) new_sect += lief.ELF.SECTION_FLAGS.WRITE new_sect.alignment = 4 new_sect.content = list (bytes ('xxhooked str hello world!\n' , encoding='ansi' )) new_sect = arm64elf.add(new_sect) code = b"\x00\x00\x00\x90\x01\x00\x2d\x91" offset = 0x9e4 text_sect = arm64elf.get_section(".text" ) addr = text_sect.search(code) + text_sect.virtual_address cs = Cs(CS_ARCH_ARM64, CS_MODE_ARM) cs.detail = True for i in cs.disasm(code, addr): print (i.mnemonic, i.op_str) ks = Ks(KS_ARCH_ARM64, KS_MODE_LITTLE_ENDIAN) page = new_sect.virtual_address - (new_sect.virtual_address & 0xfff ) pageoff = (new_sect.virtual_address+2 ) & 0xfff asm_str = "adrp x0, #0x{:x};add x1, x0, #0x{:x}" .format (page, pageoff) print ("rebuild_asm:" , asm_str)code_rebuild, _ = ks.asm(asm_str, addr) print ("rebuild_code:" , "" .join([f"{i:02x} " for i in code_rebuild]))for i in cs.disasm(bytes (code_rebuild), addr): print (i.mnemonic, i.op_str) arm64elf.patch_address(addr, code_rebuild) arm64elf.write(r"./build/hello_arm64_rebuild" )
运行patch脚本后,qemu测试成功!
0x5 后记 这篇番外教程虽然难度不高,本来以为很快就能写完了,但是写了好久。很多东西叙述起来很麻烦,我尽量结合实例清晰和有条理性地讲述,不知不觉中写了好多东西。目前关于主机系列的汉化教程非常少,以往很多的教程也都随着论坛的关闭等无法访问了。同样,比起x86的汇编的修改,arm64 elf之类的分析也不多。我系统地做《galgame汉化中的逆向》系列是想总结一下汉化方法,结合我自身对一些问题的思考和理解,以使汉化逆向这门技术今后能更好地传承下去。